Creating your first flutter app - Part 2
Getting Started
We're going to pick up right where Part 1 left off. If you haven't already been through part 1, you should check it out for the basic setup instructions.
Download
Visit the GitHub repository to clone the source. You'll want to do this because there are over 1100 lines of code in the final app, and we won't be going over every line of code, just the important ones.
This post uses the step2 branch:
git clone https://github.com/killermonk/octal_clock_app.git
git checkout step2
Clock Faces
This is obviously not going to be a good clock app without supporting multiple clock faces. We implemented a "Text" clock face in Part 1, but we also want to add Digital and Analog clock faces.
Before we can do this, though, we need to update our octal_clock import in our pubspec.yaml to 0.0.5. I realized after writing Part 1 that we needed some more constants for the analog clock face, so I added them after the fact.
octal_clock: "^0.0.5"And with that, let's dive in to the code.
What we want
We have three things that we want the user to be able to control about each clock face: type, size, color.
We will create a side bar to work as our configuration area, but we're not going to cover that until Part 3. For now, you'll just have to trust me that the things I throw in to control these attributes actually work.
A Factory for Faces
We need the ability to quickly add Watch Faces and let the user pick which one they want to use. To do this, we are going to use a Library Package to contain all our Clock Faces and use Dart's Factory Constructor to create the widgets.
Since we're creating widgets, this belongs in our widgets folder, so go ahead and create lib/widgets/clock_faces/.
We're going to break the Library convention a little bit here, for the sake of organizational convenience, and create a file that will not be part of the library in this same folder. This will be our enum for what types of clock faces are available to the user. We'll start out with just the Text clock face we already created. We'll add more entries to this as we build those clock faces.
/// The different types of clock faces that we support
enum ClockFaceType {
  text,
}
Next, lets start our package and create the widget factory
library clock_face_widget;
import 'dart:math';
import 'package:meta/meta.dart';
import 'package:flutter/material.dart';
import 'package:octal_clock/octal_clock.dart';
import './clock_face_type.dart';
// TODO package parts go here
/// A widget factory to create a given Clock Face based on its type
abstract class ClockFaceWidget implements StatelessWidget {
factory ClockFaceWidget({
ClockFaceType type,
int hour,
int minute,
int second,
Key key,
int millisecond,
double heightFactor = 0.5, // How we are going to control the height
Color color = Colors.black, // Our color config, default to black
}) {
// factory constructors aren't allowed to have initializers, so put our asserts here
assert(hour != null);
assert(minute != null);
assert(second != null);
assert(color != null);
assert(type != null);
assert(heightFactor >= 0.0);
assert(heightFactor <= 1.0);
// TODO handle our constructor data
switch (type) {
case ClockFaceType.text:
default:
// TODO create the clock face
}
}
}We want to be able to pass all of these values to the Clock Faces. Since we're all lazy and we don't want to copy/paste this constructor signature to all the child widgets, we are going to create a simple class to hold it all.
part of clock_face_widget;

/// The data that will be passed to our ClockFaces
class _ClockData {
  final int hour;
  final int minute;
  final int second;
  final int millisecond;
  final Color color;
  final double heightFactor;

  const _ClockData({
    this.hour,
    this.minute,
    this.second,
    this.millisecond,
    this.color,
    this.heightFactor,
  });
}
Now, let's pull all of our code out of clock_page.dart and create our new TextClockFace.
part of clock_face_widget;
String twoDigits(int d) {
if (d < 10) return '0$d';
return d.toString();
}
String threeDigits(int d) {
if (d < 10) return '00$d';
if (d < 100) return '0$d';
return d.toString();
}
/// A clock face that displays the time as a normal looking text string
class _TextClockFace extends StatelessWidget implements ClockFaceWidget {
final _ClockData data;
// Size from 10.0 to 50.0
static const MIN_SIZE = 10.0;
static const SIZE_RANGE = 40.0;
const _TextClockFace({Key key, this.data})
: assert(data != null),
super(key: key);
Widget build(BuildContext context) {
// Only display milliseconds if they were passed as data
final String millisecondStr = data.millisecond != null
? '.${threeDigits(data.millisecond)}'
: '';
// Format our date string
final String timeStr = '${twoDigits(data.hour)}:${twoDigits(data.minute)}:'
'${twoDigits(data.second)}$millisecondStr';
// Calculate our new font size as a percentage of SIZE_RANGE above the MIN_SIZE
final double fontSize = MIN_SIZE + (SIZE_RANGE * data.heightFactor);
// Keep everything the same about our text style except the font and color
final ThemeData themeData = Theme.of(context);
final TextStyle textStyle = themeData.textTheme.display1
.copyWith(color: data.color, fontSize: fontSize);
// Create the widget
return new Column(
mainAxisAlignment: MainAxisAlignment.center,
children: <Widget>[
new Text(timeStr, style: textStyle),
],
);
}
}The only real gotcha in this code is the actual class declaration.
class _TextClockFace extends StatelessWidget implements ClockFaceWidgetFirst, _TextClockFace: We prefixed the class with _ to make it "package private". This prevents code outside the package from accessing it. This way they have to use our factory.
Second, implements ClockFaceWidget: To work with our factory, all the classes that are created must have a standard interface, and we make that happen by implementing the abstract classes interface.
Now, we just need to plug these two classes in to ClockFaceWidget
...
// Add in our Package Parts
part './clock_data.dart';
part './text_clock_face.dart';
...
    // Handle our constructor data
    final _ClockData clockData = new _ClockData(
        hour: hour,
        minute: minute,
        second: second,
        millisecond: millisecond,
        color: color,
        heightFactor: heightFactor);
...
      // Create the clock face
      case ClockFaceType.text:
      default:
        return new _TextClockFace(data: clockData);
...
Now that we've got our widget factory ready to use, we just need to plug it in to our ClockPage. We need to do 3 things: import our new files, initialize variables to track our configurable stuff, and render the new widget
// Add these imports
import '../widgets/clock_faces/clock_face_type.dart';
import '../widgets/clock_faces/clock_face_widget.dart';

...
class _ClockPageState extends State<ClockPage> {
  // Add these variables
  ClockFaceType _type;
  double _heightFactor;
  Color _color;

  ...
  void initState() {
    ...
    // Initialize the variables to defaults
    _type = ClockFaceType.analog;
    _heightFactor = 0.5;
    _color = null;
  }

  ...
  Widget build(BuildContext context) {
    // Remove the twoDigits and threeDigits functions

    // Figure out the color we want to use
    final ThemeData themeData = Theme.of(context);
    final Color color = _color ?? themeData.textTheme.display1.color;

    return new Scaffold(
      ...
      body: new Center(
        child: new Column(
          mainAxisAlignment: MainAxisAlignment.center,
          children: <Widget>[
            // Spruce up the date a bit, so we can shove it to the top
            new Padding(
              padding: new EdgeInsets.all(20.0),
              child: new Text(date, style: themeData.textTheme.headline),
            ),
            // Expand the clock face to fill the rest of the screen
            new Expanded(
              flex: 2,
              child: new ClockFaceWidget(
                type: _type,
                heightFactor: _heightFactor,
                hour: _time.hour,
                minute: _time.minute,
                second: _time.second,
                millisecond: _time.millisecond,
                color: color,
              ),
            ),
          ],
        ),
      ),
    );
  }
We're now at the point where we can quickly add new clock faces just by changing _type.
This is the point where you are going to want to have the GitHub repository checked out, because I'm only going to cover a few parts of the next clock faces we create. They'll each get a little more time in follow up posts.
Digital Clock Face
No clock is complete without a classic looking digital clock face, so we're going to add one. It will look like this:

There is an easy way to do this and a hard way. The easy way to do this is to use a font and just have another Text clock face that uses this font. I chose not to do it this way for two reasons: I couldn't quickly find a free font that was also monospaced, and I really just wanted to build my own from scratch.
So, let's dive in to the Hard Way™.
Our Digital "font"
I'm only going to cover a portion of the code for our digital font in this post. For more detailed information, see the follow up post.
Our "font" is really three widgets in a library that render Custom Painters. Our three widgets are:
DigitalDot: the.between seconds and millisecondsDigitalColon: the:between hours/minutes/secondsDigitalNumber: the actual numbers and digits that make up the time
Let's create our package in lib/src/widgets/digital_font
library digital_font;

import 'package:meta/meta.dart';
import 'package:flutter/material.dart';

part './digital_dot.dart';
part './digital_colon.dart';
part './digital_number.dart';
We'll go over a few details about digital_colon.dart to cover the basics of how we are using the Custom Painters, but you'll want to just grab the other two files from the GitHub repository.
class DigitalColon extends StatelessWidget {
final double height;
final Color color;
DigitalColon({Key key, this.height, this.color})
: assert(height != null),
assert(color != null),
super(key: key);
Widget build(BuildContext context) {
return new CustomPaint(
size: new Size(height / 2.0, height),
painter: new _DigitalColonPainter(height, color),
);
}
}
...There's really nothing special in the Widget portion of the file. We receive the height and the color as constructor arguments, then pass those along to a Custom Paint widget.
An important item to note: we give the Custom Paint a size. This is useful because regardless of how much we paint inside of it, it will always take up size area on the canvas. This is what allows us to make this "font" monospaced. We have defined each character as half as wide as they are tall.
Now the fun part, in the same file.
...
class _DigitalColonPainter extends CustomPainter {
final double height;
final Color color;
_DigitalColonPainter(this.height, this.color);
bool shouldRepaint(_DigitalColonPainter oldDelegate) {
return height != oldDelegate.height
|| color != oldDelegate.color;
}
void paint(Canvas canvas, Size size) {
final double width = height / 2; // Half as wide as we are tall
final double thickness = width / 5; // Arbitrary size that I liked
final Paint paint = new Paint()
..color = color
..style = PaintingStyle.fill;
// Top dot
canvas.drawRect(new Rect.fromLTWH(
width / 2 - thickness / 2,
height / 3 - thickness / 2,
thickness,
thickness,
), paint);
// Bottom dot
canvas.drawRect(new Rect.fromLTWH(
width / 2 - thickness / 2,
height * 2 / 3 - thickness / 2,
thickness,
thickness,
), paint);
}
}First, shouldRepaint. Since this is a static component (a colon), we will only repaint it if we explicitly change one of its attributes.
Second, final Paint paint = new Paint().... This is where we set up our styles for how this is going to be painted. We care about two things, the color and that we fill the shapes we paint.
Third, canvas.drawRect(new Rect.fromLTWH(...), paint). This is where the magic actually happens. We create a rectangle from the left-top corner by giving it the width and the height. We want to colon centered on the canvas, so our left is half the canvas' width minus half the colon's thickness. The top locations were mostly just moving around until they were in a place I liked. The width/height of the rectangle are just the thickness of the colon, so our regtangle is actually a nice square. We pass it our previously created paint object and the canvas does the magic for us.
The DigitalNumber class, that actually does the majority of the work for this clock face, works on these same principles. It's a little more complicated because of the shape of each of the "pixels", and determining which pixels to show for each number, but it's not too complicated. We'll cover it in more detail in a follow-up post.
The actual Clock Face
The actual DigitalClockFace class is pretty straight forward, so I'm not going to go over its code in detail. We take our ClockData and we render the DigitalNumber widgets for hours, minutes, seconds, and optionally milliseconds, and throw in our DigitalColon and DigitalDot where appropriate.
There is a bug with this clock face. We currently use a Row to group our child widgets together, so if the text gets too large it overflows the display instead of wrapping to a new line.
It would make a lot more sense to use the Wrap widget for the children. This would also allow us to remove the padding widget. I'm leaving it as an exercise for the reader to implement this change.
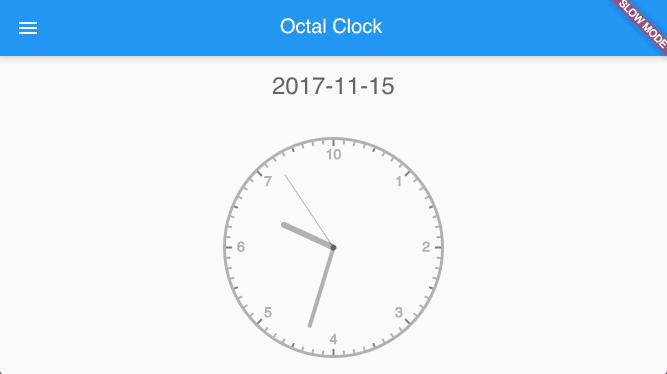
Analog Clock Face
The analog clock face is the whole reason for the octal clock. Up to this point our clock has all been textual displays, and they just don't make all that much sense. Someone looking at a textual display will quickly get confused when the clock goes from 17 to 20, and the like. With an analog clock face, though, anyone who knows how to read a normal imperial 12-hour clock, can just innately understand what is going on. Plus, they just look good!

Look how nicely everything can be divided! Since 8 is a power of 2, each logical segment can be evenly divided in half.
So, let's dive into a little bit of code. You'll want to referenced the GitHub repository again for the code for this file, since I'm not going over it all.
class _AnalogClockFace extends StatelessWidget implements ClockFaceWidget {
final _ClockData data;
// Size from 125.0 to 175.0
static const MIN_SIZE = 125.0;
static const SIZE_RANGE = 175.0;
_AnalogClockFace({Key key, this.data})
: assert(data != null),
super(key: key);
Widget build(BuildContext context) {
final double length = MIN_SIZE + (SIZE_RANGE * data.heightFactor);
return new CustomPaint(
  size: new Size(length, length),
  painter: new _ClockDecorationPainter(data.color),
  foregroundPainter: new _ClockHandsPainter(
      data.hour, data.minute, data.second, data.color),
);
}
}
... custom painters are down here ...We'll cover the custom painters for this, as well as the trigonometry for determining hand angles and lengths in a follow up post.
First, the values for MIN_SIZE and SIZE_RANGE were determined by trial and error on an iPhone 8 simulator. If we get smaller than 125 the numbers get all mashed together, and 175 seemed like a nice size that left a margin on the display.
Let's look at the CustomPaint widget we are returning, since it's different than our digital font widgets.
return new CustomPaint(
size: new Size(length, length),
painter: new _ClockDecorationPainter(data.color),
foregroundPainter: new _ClockHandsPainter(
data.hour, data.minute, data.second, data.color),
);We broke this clock face into two painters: _ClockDecorationPainter that handles drawing everything but the hands and _ClockHandsPainter that, predictably, draws the hands of the clock. This was done for the specific purpose of optimization. There are 80 different decorations that are drawn and it's silly to redraw those all the time when they are static.
Our shouldRepaint method for decorations only repaints if the color changes. For the hands, it repaints if the color or any of the time fields change.
From the CustomPaint docs, the painter is painted "before the children" and the foregroundPainter is painted "after the children". Since this widget doesn't actually have children, this was a convenient way of grouping these two painters together and making them paint in the same space on the canvas.
Tying the Clock Faces together
Now that we've created these other two clock faces, we just have to include them as part of our ClockFaceWidget by adding them to our enum and factory constructor's switch statement.
enum ClockFaceType {
  text,
  analog,
  digital,
}...
part './digital_clock_face.dart';
part './analog_clock_face.dart';
...
abstract class ClockFaceWidget implements StatelessWidget {
...
switch (type) {
case ClockFaceType.analog:
return new _AnalogClockFace(data: clockData);
case ClockFaceType.digital:
return new _DigitalClockFace(data: clockData);
case ClockFaceType.text:
default:
return new _TextClockFace(data: clockData);
}
...
}And there it is! Our app now has three clock faces with configurable size and color. Our _ClockPageState is currently defaulting the type to analog, so that's the only face that will display if you run the app right now. To see the different options, update the default values in _ClockPageState.initState and relaunch the app.
The only thing left is to actually be able to let the user configure these settings. I want to be able to go into this in a little more detail, so I'm going to cover the Settings Drawer in Part 3.