Firebase Firestore
Getting Started
We're going to update our TodoMVC app that we augmented with Firebase Signin in Part 2 to integrate it with Firestore as our storage engine.
Download
Visit the [GitHub repository] to clone the source. This is highly recommended so you can play with the app. The final source code for this part is tagged as firebase_firestore.
After cloning, you can checkout the code with git checkout firebase_firestore.
Add dependencies
To use Firestore, we first need to add the Cloud Firestore dependency to our pubspec.yaml.
dependencies:
  cloud_firestore: ^0.2.6
We need to make sure that we run flutter packages get after these modifications.
Then we need to add the import to our app library so that all our files can see it.
import 'package:cloud_firestore/cloud_firestore.dart';Set up Firebase for our App
Before we can actually interact with cloud firestore, we have to enable it for our app. Go to the Firebase Console and click on the TodoMVC project that we set up in Part 2.
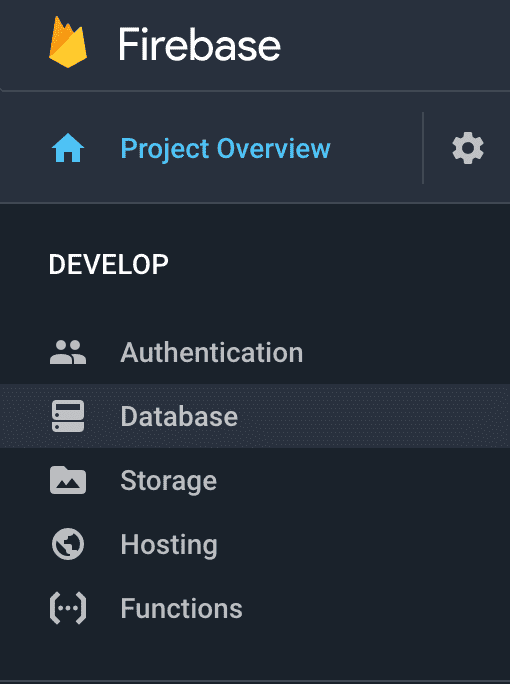
Once there, expand the left-hand menu and click on "Database".
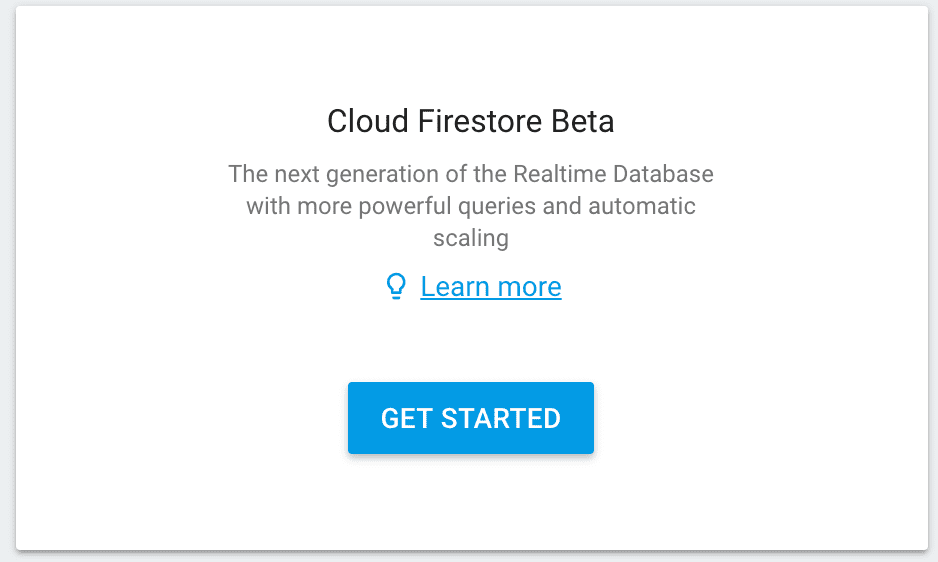
On the database screen, click the "Get Started" button in the Cloud Firestore Beta box. It may warn you that this will preclude the use of Real-time DB, but that's what we want.
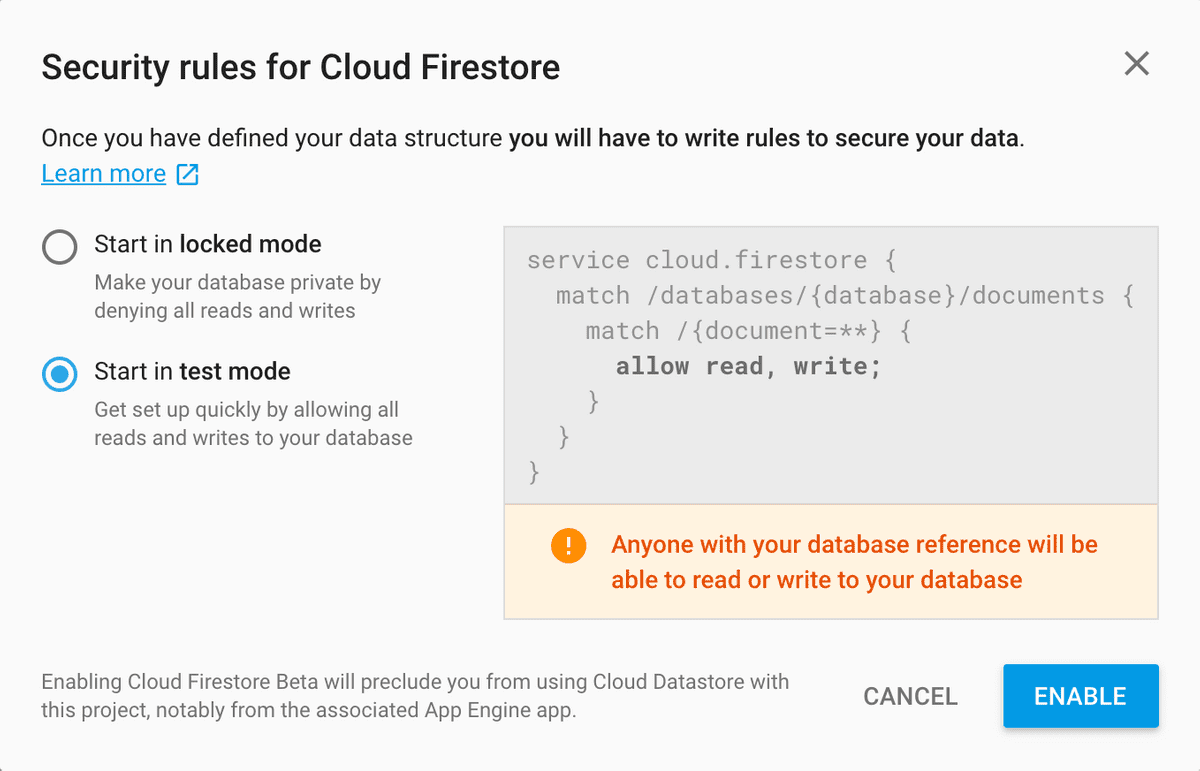
We're going to start our database in Test Mode during development. We'll add in permissions later once everything is shiny.
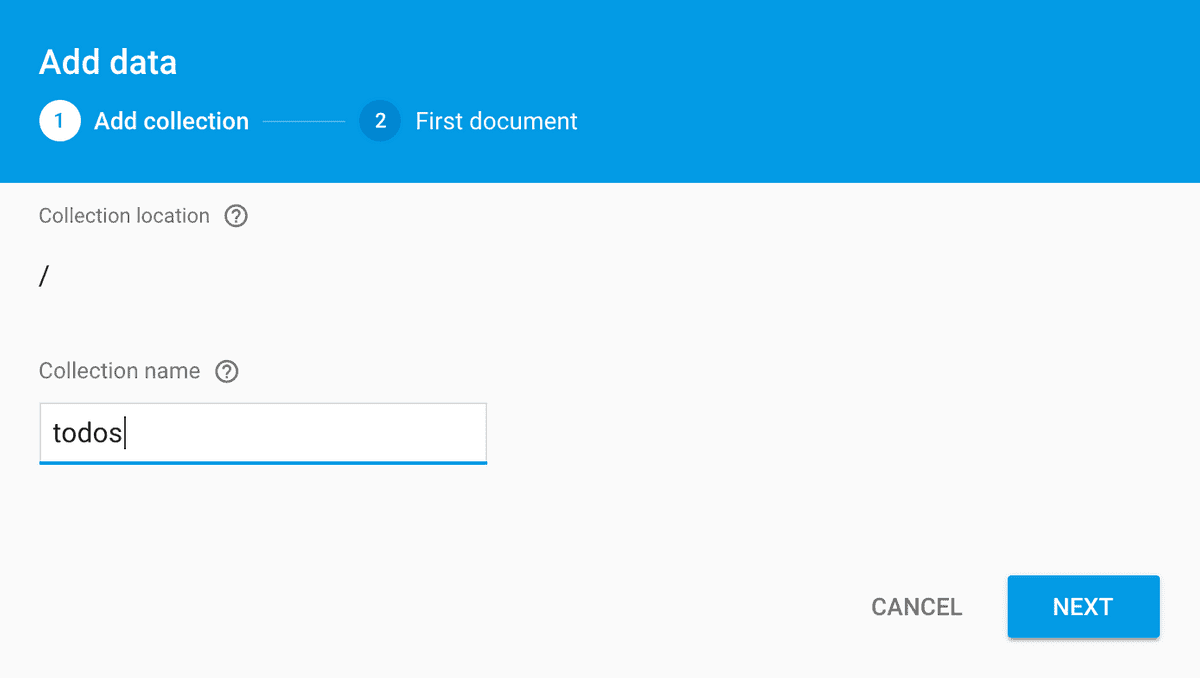
After the project provisions (which may take a minute or two), we're almost ready to go. We need to create the collection where we are going to store our records. Click the + Add Collection menu item.

This is pretty straight forward on the first step. We're going to name our collection todos, then click Next.
The setup wants us to create our first record. This is useful if you're wanted to test the read functionality of the app first. This step looks a little more daunting, but don't worry. Below is a sample of what our records are going to look like (you don't have to do this, keep reading below the image):
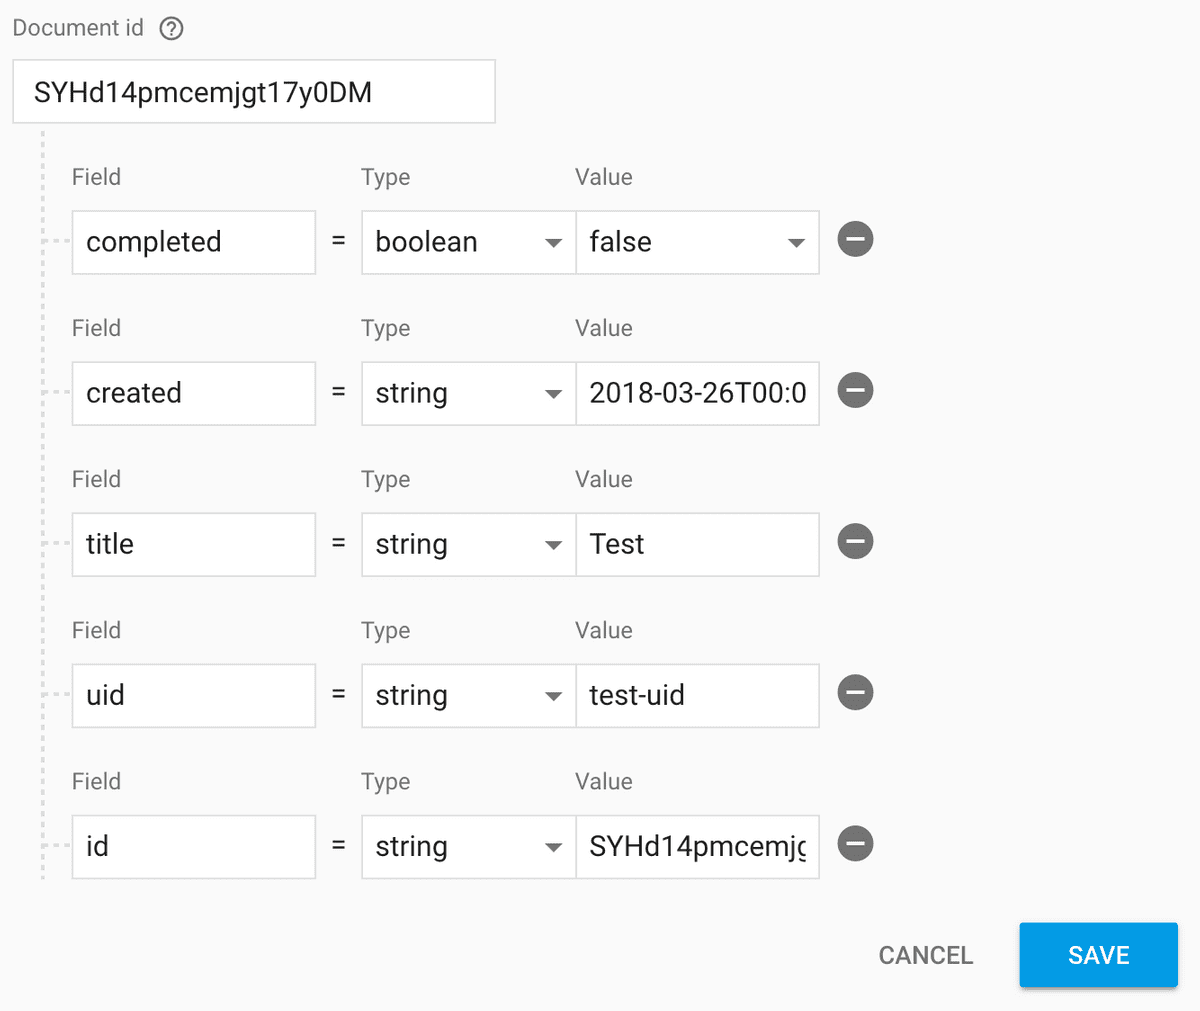 A couple notes.
createdis an ISO 8601 UTC datetime string. When I wrote this code, there existed a crashing bug with cloud_firestore's handling of Timestamp fields. We used a string to avoid said bug. That bug has since been fixed, but since we're not filtering on this field, a string is sufficient for our needs.- If you want to use this for testing,
uidshould be the actual UID for your User. This can be found in the authentication section on the left-hand menu.
If you don't want to create your first record right now, just click the "AUTO-ID" button, then click Save. You can delete this empty record later once things are ready to go.
Because we already got our app all set up with Firebase during Part 2, there is nothing left for us to do here for set up. We can jump right in and start writing code.
Todo CRUD
The Firestore Data Model uses documents for its data. For the most part, you can think of these as JSON objects (see the docs here).
TodoItem Model
We're going to add the ability to serialize and deserialize our todo items to our model.
  TodoItem.fromMap(Map<String, dynamic> data)
      : this(id: data['id'], title: data['title'], completed: data['completed'] ?? false);

  Map<String, dynamic> toMap() => {
        'id': this.id,
        'title': this.title,
        'completed': this.completed,
      };
We've added a new constructor TodoItem.fromMap to deserialize the Firestore map into our local object. Our constructor just blindly assumes that all the needed data fields will be present and valid, so we just uses an initializer list to assign all the values.
The toMap method serializes our local object to the Map that we will pass to Firestore.
TodoStorage Service
I decided to use a "Service" as the Proxy between the app and Firestore. This seemed like a good way to separate the business logic and the display logic.
House Keeping
We need to remember to add this to our todomvc app so everything can see it. Add the following part to our TodoApp.
part 'services/todo_storage.dart';Initialization
First, we're going to create the service and our static interface to Firestore. This creates a light weight wrapper object that stores the path for us. The CollectionReference is basically just an in-memory alias.
part of todomvc;

final CollectionReference todoCollection = Firestore.instance.collection('todos');
Next, we're going to create the constructor and some helpers. Because each TodoItem is associated with a user, we're going to keep a reference to the user as part of the instance of our service. It just simplifies all our permissions checks.
class TodoStorage {
final FirebaseUser user;
TodoStorage.forUser({
this.user,
}) : assert(user != null);
static TodoItem fromDocument(DocumentSnapshot document) => _fromMap(document.data);
static TodoItem _fromMap(Map<String, dynamic> data) => new TodoItem.fromMap(data);
Map<String, dynamic> _toMap(TodoItem item, [Map<String, dynamic> other]) {
final Map<String, dynamic> result = {};
if (other != null) {
result.addAll(other);
}
result.addAll(item.toMap());
result['uid'] = user.uid;
return result;
}
// ... snip
}Our constructor is pretty straight forward. We're just setting the user object and assert it is not null. Our helpers are a little more subtle.
fromDocument converts one of our database objects into a TodoItem. You may notice that this is a public method. That's because I was lazy. Our list method (see the "Read" section) returns a stream of Documents. Rather than writing an adapter for this stream to convert all the elements to TodoItems, we're just going to let the method consuming the stream do it.
_fromMap is just a simple wrapper to create a new TodoItem that we will use several times in our Future handlers.
_toMap is a bit awkward. The document we store in Firebase has some extra meta data that our TodoItems don't have: uid (tying the document to a given user), and created (the string holding our creation date). The uid is forcefully set, as you can see, each time so it doesn't ever get forgotten. We use the optional Map other to set the other (see what I did there?) meta data when appropriate. We specifically add the TodoItems data to the map after the other data to make sure that critical fields are authoritatively set by the item and not accidentally overwritten by fields in other.
Create
  Future<TodoItem> create(String title) async {
    final TransactionHandler createTransaction = (Transaction tx) async {
      final DocumentSnapshot newDoc = await tx.get(todoCollection.document());
      final TodoItem newItem = new TodoItem(id: newDoc.documentID, title: title);
      final Map<String, dynamic> data = _toMap(newItem, {
        'created': new DateTime.now().toUtc().toIso8601String(),
      });
      await tx.set(newDoc.reference, data);

      return data;
    };

    return Firestore.instance.runTransaction(createTransaction)
    .then(_fromMap)
    .catchError((e) {
      print('dart error: $e');
      return null;
    });
  }
We establish our pattern here for how we do our database interactions. We create a Transaction that does all the work, then simply run that transaction. We then handle the result and return something, or we log the error and return null.
Our transaction here does a few things:
- Create a new document reference. We do this so Firestore will create our GUID for us.
- Create a very basic
TodoItemobject with the data that we will use in our helpers. - Convert the
TodoIteminto aMapthat we can send to Firestore. This includes setting thecreateddate. - Save the data to the document we created in Step 1.
After we run the transaction, we pass the Map of our data to the _fromMap helper and return the newly created TodoItem.
Read
  Stream<QuerySnapshot> list({int limit, int offset}) {
    Stream<QuerySnapshot> snapshots = todoCollection.where('uid', isEqualTo: this.user.uid).snapshots;
    if (offset != null) {
      snapshots = snapshots.skip(offset);
    }
    if (limit != null) {
      snapshots = snapshots.take(limit);
    }
    return snapshots;
  }
The way our app is built, we don't ever need to read a single todo. We are always interested in querying the whole list, so here we set that up.
First, we make sure that we're only getting todos for the authenticated user todoCollection.where(...), then we apply our offset and/or limit if we have them. We return the Stream to be consumed by the caller.
Update
  Future<bool> update(TodoItem item) async {
    final TransactionHandler updateTransaction = (Transaction tx) async {
      final DocumentSnapshot doc = await tx.get(todoCollection.document(item.id));
      // Permission check
      if (doc['uid'] != this.user.uid) {
        throw new Exception('Permission Denied');
      }

      await tx.update(doc.reference, _toMap(item));
      return {'result': true};
    };

    return Firestore.instance.runTransaction(updateTransaction).then((r) => r['result']).catchError((e) {
      print('dart error: $e');
      return false;
    });
  }
Here we repeat the pattern first established in Create. Our transaction does the following:
- Reads the document from Firestore.
- Validates it belongs to the user, throwing an error if it does not.
- Updates the document using its
reference.
Delete
  Future<bool> delete(String id) async {
    final TransactionHandler deleteTransaction = (Transaction tx) async {
      final DocumentSnapshot doc = await tx.get(todoCollection.document(id));
      // Permission check
      if (doc['uid'] != this.user.uid) {
        throw new Exception('Permission Denied');
      }

      await tx.delete(doc.reference);
      return {'result': true};
    };

    return Firestore.instance.runTransaction(deleteTransaction).then((r) => r['result']).catchError((e) {
      print('dart error: $e}');
      return false;
    });
  }
You may have noticed the pattern by now: We get the document, verify its owner, then perform our action (delete) on it.
I chose here to do a hard delete instead of soft for simplicity's sake. The data is simple enough for the user to restore if they accidentally delete a todo that it's not worth leaving them around.
And there you have it. That's all the interactions with Firestore we need to make the entire app work with the new store. Now we just need to plug this in to our UI.
UI Overhaul
We need to make one change to the UI as part of our Firebase integration. Because the firebase service is remote, and we want to show the user what we're doing, we are going to add the ability to "disable" a Todo Item in the list. When we are performing a remote asynchronous operation, we will disable the item until the operation has finished.
NOTE The Firease SDK (which backs the flutter plugin) supports offline transactions that will sync once an internet connection becomes available. We are ignoring this for now and assuming an internet connection always exists. In fact, if you kill your mobile/wifi data connection while the app is running, it will generate an I/O Error about a broken connection and break everything.
First, we are going to add a boolean flag disabled to our TodoWidget.
class TodoWidget extends StatefulWidget {
final TodoItem todo;
final bool disabled;
final ValueChanged<bool> onToggle;
final ValueChanged<String> onTitleChanged;
final VoidCallback onDelete;
TodoWidget({
Key key,
this.todo,
this.disabled = false,
this.onToggle,
this.onTitleChanged,
this.onDelete,
}) : assert(todo != null),
super(key: key);Next, we'll update our _buildTitle method to disable the long-click ability and to grey the title when it is disabled.
  Widget _buildTitle(BuildContext context) {
    // Color the title grey if it is disabled
    final ThemeData theme = Theme.of(context);
    TextStyle titleStyle = theme.textTheme.body1;
    if (widget.disabled) {
      titleStyle = titleStyle.copyWith(color: Colors.grey);
    }

    return new GestureDetector(
      child: new Text(widget.todo.title, style: titleStyle),
      onLongPress: widget.disabled
          ? null
          : () {
              // Long press to edit
              if (widget.onTitleChanged != null) {
                setState(() {
                  _editMode = true;
                });
              }
            },
    );
  }
Setting the onLongPress callback to null when the widget is disabled also disables the InkWell animations for the action.
Lastly, update our build method.
  Widget build(BuildContext context) {
    final Widget titleChild = (!widget.disabled && _editMode) ? _buildEditTitle() : _buildTitle(context);
    return new Row(
      children: <Widget>[
        new Checkbox(
          value: widget.todo.completed,
          onChanged: widget.disabled ? null : widget.onToggle,        ),
        new Expanded(
          flex: 2,
          child: titleChild,
        ),
        new IconButton(
          icon: new Icon(Icons.delete),
          onPressed: widget.disabled ? null : widget.onDelete,        ),
      ],
    );
  }
In this, we make sure we only render the edit box if we are not disabled, then we disabled the interactions with our various buttons.
Now on to the hard part, integrating with our Todo List.
All the following changes discussed here will be in src/pages/todo_list.dart, specifically in TodoListState. There are a lot of them, so I'm going to try to break it down into bite size pieces.
Step 1: Initialization
First, we need to track a few more things.
  Set<String> disabledTodos;

  StreamSubscription<QuerySnapshot> todoSub;
  TodoStorage todoStorage;
  FirebaseUser user;
disabledTodos is the list of Todo IDs that are disabled in the UI while async operations are being performed.
todoSub is our StreamSubscription to the Snapshots for the current user.
todoStorage is our instance of our service.
user is the current user that we will use to initialize todoStorage.
Now, to initalize all the things.
  void initState() {
    super.initState();
    typeFilter = TypeFilter.ALL;
    todos = [];
    disabledTodos = new Set();

    _auth.currentUser().then((FirebaseUser user) {
      if (user == null) {
        Navigator.of(context).pushReplacementNamed('/');
      } else {
        todoStorage = new TodoStorage.forUser(user: user);
        todoSub?.cancel();
        todoSub = todoStorage.list().listen((QuerySnapshot snapshot) {
          final List<TodoItem> todos = snapshot.documents.map(TodoStorage.fromDocument).toList(growable: false);
          setState(() {
            this.todos = todos;
          });
        });

        setState(() {
          this.user = user;
        });
      }
    });
  }
The magic starts on line 7. _auth.currentUser() is a stream the returns the current logged in user, or null after a logout. We subscribe to this stream so that we can react to any auth changes. We redirect to the login page in the event of a logout. Otherwise, we set everything up for the current user.
We first create a new instance of our TodoStorage service. We unsubscribe to any previous service instances we may have had (since our Stream can just feed us data at any time). Finally, we subscribe to our new list() of Todos for the current user.
Inside that subscription, we convert all the available Todo documents into our TodoItem model, and set these on the state.
Step 2: Display
We're going to start by breaking up our build method, just to keep things clean. We'll create a new method called buildContent to do the work of displaying the body. We need to use the remainingActive calcuation in multiple places, so we'll leave it in build, but we're moving all the other variables into our new function.
Update the scaffold, in build with the new body:
body: buildContent(remainingActive),Now, we create the content:
  Widget buildContent(int remainingActive) {
    if (user == null) {
      return new LoadingIndicator();
    } else {
      /// ... snip of previous body content, verbatim
    }
  }
Firstly, if we don't have a user, we're going to display our WaitingIndicator until we have one. This lets the user know that the app isn't just broken.
If we have a user, we'll render the body content just like we use to. This is the same Column that used to be the Scoffold's body, but we just copy/pasted it to here.
The final part of the display is updating our _buildTodoItem method to handle the new disabled flag and to have some new callbacks.
  IndexedWidgetBuilder _buildTodoItem(List<TodoItem> todos) {
    return (BuildContext context, int idx) {
      final TodoItem todo = todos[idx];
      return new TodoWidget(
        key: new Key('todo-${todo.id}'),
        todo: todo,
        disabled: disabledTodos.contains(todo.id),        onToggle: (completed) {
          this._toggleTodo(todo, completed);        },
        onTitleChanged: (newTitle) {
          this._editTodo(todo, newTitle);
        },
        onDelete: () {
          this._deleteTodo(todo);        },
      );
    };
  }
These new callbacks are important, as they're where we will interact with Firebase.
Step 3: Interactions
Now we just need to make the user interactions actually hit our TodoStorage service.
First, let's add two helper functions to make life a little cleaner when adding/removing todos from our disabled list:
  void _disableTodo(TodoItem todo) {
    setState(() {
      disabledTodos.add(todo.id);
    });
  }

  void _enabledTodo(TodoItem todo) {
    setState(() {
      disabledTodos.remove(todo.id);
    });
  }
Now that that's out of the way, let's update the _toggleAll callback, then create some new callbacks to actually interface with our TodoStorage service.
  void _toggleAll(bool toggled) {
    todos.forEach((t) => this._toggleTodo(t, toggled));
  }

  void _createTodo(String title) {
    todoStorage.create(title);
  }

  void _deleteTodo(TodoItem todo) {
    this._disableTodo(todo);
    todoStorage.delete(todo.id).catchError((_) {
      this._enabledTodo(todo);
    });
  }

  void _toggleTodo(TodoItem todo, bool completed) {
    this._disableTodo(todo);
    todo.completed = completed;
    todoStorage.update(todo).whenComplete(() {
      this._enabledTodo(todo);
    });
  }

  void _editTodo(TodoItem todo, String newTitle) {
    this._disableTodo(todo);
    todo.title = newTitle;
    todoStorage.update(todo).whenComplete(() {
      this._enabledTodo(todo);
    });
  }
These are all pretty straight foward when it comes to interacting with our service. And, you can see we're disabling each item before our async action happens, then re-enabling it after the action is complete.
NOTE
The _deleteTodo callback also calls _enableTodo, which feels a little redundant. However, we're only doing this when there was some sort of error and the item couldn't be deleted.
And with that, we are now persisting all our Todo changes to Firebase in real-time.
An example of the new disabled handling is below. You can see everything disabled briefly after the check box is clicked.

By the way, a bunch of the tests are now going to fail. We need to mock out our Firestore dependency to get them working. I'll cover how to do that in the next post.
